Showing posts with label Crafting. Show all posts

Tuesday, October 8, 2013

Frame-worthy

After taking on the curtains, I had found a few cute ideas to bring color onto the walls via Pinterest. I finally settled on the frame idea, thinking I could go garage sale hunting and find some cheap frames and paint them our nursery colors. Well, it turns out when you’re looking for something specific at a garage sale; you’re not likely to find it.

Luckily one of those “looking” weekends we were driving around and I saw Aaron Brothers was having a buy one get one for one cent sale, and we stopped in. Boy were we excited when we walked in and saw an even better sale going one which was the buy one get TWO FREE! We ended up finding a set of 5, gorgeous decorative white frames with hooks and all (normally $50) and we bought two of them along with another gorgeous frame we decided to keep for ourselves and ended up with 10 frames of varying sizes for our wall all for $50!

Here’s an e-bay picture of what the frames looked like in the box, but in the pictures below you’ll see the detail of the frames truly pop!


Second thing I did after finding the frames was rummage through my house and try to find different shades of our nursery color. This was really great because I didn't have to buy any paint!

**Note: after painting all the blue frames I was a little frustrated with how many coats it took and opted to buy a brighter spray paint orange color for the bigger, more decorative frames.**  

After all was said and done, it took about two weeks to get the frames ready to hang on the wall. I ended up buying a clear spray paint to seal the rest of the frames and give them a glossy look – so the whole process was a little more time consuming than I wanted, but the results were great!

Here are some pictures of the painting process, drying and the results:


When it came to hanging the pictures, we picked the big turquoise one for the middle, to hold our beautiful elephant head and then winged it from there. Originally, I was hoping for different shaped frames and since we weren't able to do that, I wanted to add ribbon to give some of the frames a little more dimension. It actually proved a lot harder than they make it look on Pinterest and in the stores. Here’s how our framed wall turned out:


We found this cute little guy and couldn't resist plopping him on our fun rocker!
What do you think of our nursery so far?

Friday, October 4, 2013

Nursery Curtains


Nursery so far, after curtains & new 2" blinds!
While I’m still working on the nursery, I’m falling very behind on my posts so my second big nursery project was the curtains. After many failed attempts to find my idea of the perfect nursery curtains, I decided it couldn’t be that hard to make them … after all I do have a sewing machine and some creative energy to burn.

Since I’d never made curtains before, I started by googling and doing my research on Pinterest. I searched: how to make easy lined curtains –To my surprise I ran across the easiest post from my pastor’s wife, Robie! Not only was it easy to follow, but she added a cute trim that I had never seen before and really brought my colors together.

My idea was even though it’s a nursery the curtains should feel fun but be able to grow with our child so I didn’t want something too “baby”ish. Not to mention, it’s very hard to find our color combination and have it work for a gender neutral nursery. So I set off to a fabric store with my mom one day and we picked a few fabrics we really loved. You can see them in the pictures below:

We thought in the end, this looked a little too feminine

We ended up deciding on the second fabric down.

This was our runner up, as you can see..it's quite beautiful as well.

They were all beautiful, but the orange with white and brown seemed too girly, and once we matched the other fabric against our rug and crib, it was obvious our choice had to be the blue and gray. I also ran with Robie’s idea of adding the trim and that would help me bring in the orange.

It wasn’t all that difficult, but I did need to dust off the sewing machine and re-learn it. If you look close enough, you can see the stitching isn’t exactly perfect or perfectly straight, but they were definitely made with LOVE!

I personally think they turned out great. In all, they took a week. I left room at the top of the curtain to be able to fit in the rod, but I really loved the clean look of the hooks and so I ended up buying 2 packs of those clip-hooks to hang the curtains and voila!  If you're looking for a step-by-step guide to creating your own curtains, I highly suggest checking out Robbie's post here!

Check out more pictures of the curtains below:


Tuesday, August 20, 2013

Baby Nursery Basics

Since we’re not finding out the gender of Baby K we decided to pick a fun color scheme for our nursery. We knew we wanted something light and bright, and we wanted to keep it classy. So, over Memorial weekend we found out Home Depot was having a $5 off paint sale… and that was our jumping off point. We perused the store for a bright base color that was not too neutral but not overwhelming. Previously, the nursery was our office and it was a darker brown color, which made the room look small.

Our office before

furniture removed, working on taping and patching holes

We settled on a color called double click, which is bright grey and began taping and painting, it took about 3 coats to really cover all the brown, but as you can see the brightness of the gray makes the room look so fresh and open.

Our first coat of paint on one wall

Patching huge holes from the previous curtains

A couple coats of paint on the wall, still needing to do touchups


We thought it’d be even lighter and better if we could add crown molding so I took to Pinterest to find out how to do it. These were the 2 tutorials I found most helpful:  This Old House, this one includes a video of the type of cuts, and Home Depot. I had a $100 gift card to Home Depot, and with that, we were able to purchase all of our supplies for the room.

We had no idea the enormity of the project we took on...it took a lot of patience and a couple of weeks of work to actually get it looking good. 

Here are some pictures of the whole process:

Our supplies to transform the room

My husband looking for studs to make sure we can correctly anchor the trim


Our lovely work space...most people use the garage..not us

Making sure the crown fits

Figuring out how to do outside and inside corners is tough

The corners were so tough we had to redo some of them by cutting in and installing the pre-made corners. They ended up looking even better and added such an elegant look!

Step 432 : Caulking..thankfully my husband is the best and oh so handy

After a couple of coats of paint on the trim and the wall this is our semi finished product.

After a couple of coats of paint on the trim and the wall this is our semi finished product.

All the knobs were gold before, I actually painted them all around our house as another project.

Finally after we had everything trimmed and looking great, we had new carpet installed…Ta Daaa…

Still missing face plates but don't you love the subtle design in the carpet...now baby truly has a "fresh start."

Our accent colors are orange and turquoise and we have espresso colored furniture to finish it all off. You can check out some of those pictures on my Instagram account or just keep reading the blog. Everything so far has been a fun project so I do plan on writing about every bit of it! I’ve loved creating this room literally from scratch and we can’t wait for the arrival of our sweet little baby.

Tuesday, February 12, 2013

It's our love in a box

With Valentine's Day right around the corner, February is often a time when we reflect on love. For some it's hard to get through, and true it is over-commercialized. By the time you're pressured into $100 flowers/ chocolates and a big fancy dinner at a restaurant which books months-out just for this day...it's a little overkill.

For me, February is a love month for another reason: my husband and I are coming up on our one-year anniversary! We've decided to not buy into the hype of Valentine's Day and instead invest that time and effort into our anniversary.

It's so hard to believe we've almost been married one year, but we have and I couldn't be more excited about the times we have coming up. We have alot of things going on for our anniversary and I won't reveal it all in one post so stay tuned.... BUT ... What I'm most excited about is officially starting our first family tradition.

As part of the unity ceremony during our wedding we decided to do something a little different. We found this really great box with a holder for champagne/wine and glasses. This box was placed up at the altar opened, and during the unity ceremony we had our parents pre-write letters to us for us to open on our first anniversary. During the ceremony while our aunt Traci sung "Feels Like Home to Me" our mothers came up and dropped off their letters in our box and our preacher explained to our guests what was going on and about our new tradition. The tradition is going to be writing letters to each other to read for the next year (& saving them eventually for our children). We placed our letters in the box during the ceremony and locked it up until Feb. 25, 2013...which is just a few short weeks away, and I CANNOT wait.

I'm super excited to read our letters while sipping champagne, celebrating each other and our love. Then writing new letters to each other to lock away for 2014. Just for you guys, I unlocked the box to snap a few pictures and show you what i'm talking about so you can be as excited as I am. Enjoy the pictures below and let me know what you think of our tradition. Also, feel free to share your traditions with me. I'm always looking for special and meaningful ideas.

Our special box!

Letter to read on Feb 25th

One more look
P.S. We are keeping Valentine's low key by doing our own wine, cheese and bruschetta night and catching a scary movie on cable or pay per view

Saturday, November 12, 2011

Bouquets of Fun

Some of our creations bunched together. 
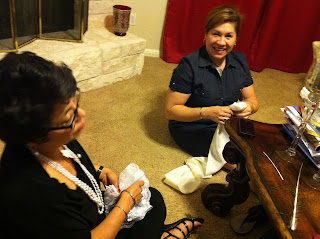
When my grandmother was in from Mexico and my aunt from Arkansas, one night we all got together for a girls night. In this girls night we were supposed to be doing lashes and girly things. Well, we did get around to those girly things, but something else remarkable happened.

Earlier that day, I had gone to lunch with my mom, aunt and grandmother, who we call "Mother." My mom brought up an idea I had mentioned a while back about getting a bouquet made out of broaches and/or fabric. Well of course, being the creative family we all are, we decided we could take it on as a project and build it ourselves. So, we decided to take advantage of our girls night and star making my wedding bouquet. 

My mom and I followed their advice on what types of fabric to buy, and we found alot of different textures and color...yes, I said color. We even have a splash of the wedding-taboo color black in the bouquet. 

My grandmother is practically a genius when it comes to making flowers and crafty things like that. My aunt Debbie also remembered my grandfather Lio's mom used to make "handmade lace" or "crochets." She was able to find some of it stored away, and we made bouquet flowers out of it too. It was a whole mess of fun, and while I don't have a finished product yet, I have all the flowers thanks to all the ladies of my family. 

We all sat down and created our own masterpiece. It was certainly a memory I will never forget. 

When it comes time to marry Josh, not only will I be assured I have my family's blessing and support, but also a piece of them will be up there at the altar with me. And when I get the bouquet preserved, I know I will forever have that to cherish. 

Here are some photos of the unfinished product, i'll post finished photos later:
Two of aunts, mom and mother all hard at work.

Cousin Gregory and Aunt Yvonne.

The beginnings of one of Mother's beautiful flowers.

How fun does this look!

Hard work, determination and lots of laughter

More flower making :)

Many jokes and fun stories filled our night.

My mom showing off her handmade beauty.

My Aunt Yvonne's beautiful lacy flower.

Perfect little flowers and the mess behind it.

Mi Familia

Welcome to your birth month Baby K

November is finally here. Some days have gone by more slowly while others have flown by. One thing is for sure, you are very, very loved lit...